How to Create Kubernetes Homelab

How to create Kubernetes home lab on an old laptop
Introduction
I’ve recently “discovered” and old laptop forgotten somewhere in the depths of my basement and decided to create a mini home lab with it where I could play around with Kubernetes.
Here are the specs:
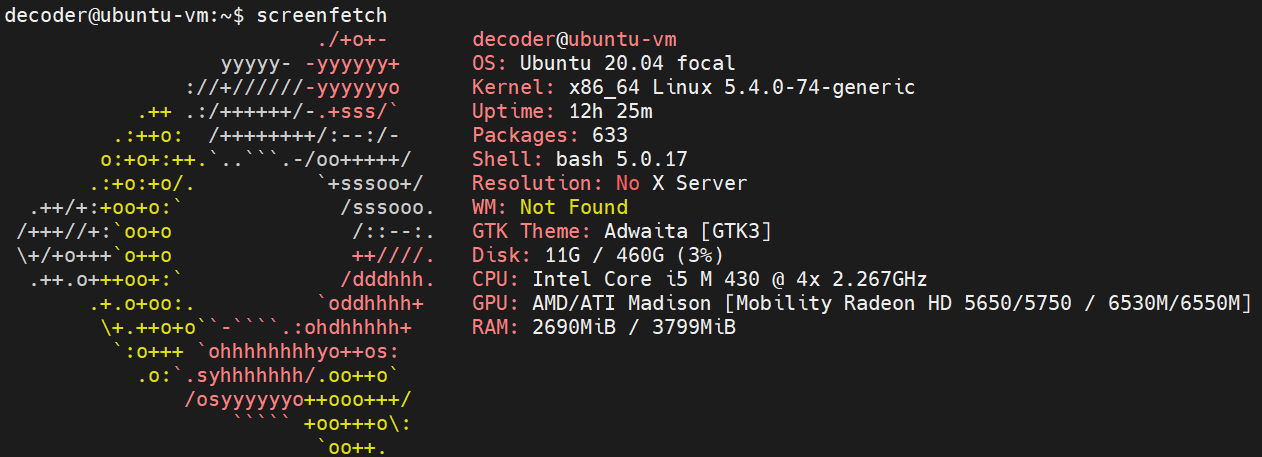
In this blog, we are going to go through the whole setup process and end up with usable Kubernetes setup. The goal is to create a simple but fully fledged Kubernetes setup that we can quickly spin up and keep alive for some time to run simple workloads and learn/test.
The end architecture would like like this:

Install ubuntu
Start by downloading ubuntu and burning it to a USB. I have used etcher and downloaded ubuntu 20.04.2 LTS from official page using torrent link. For torrents download I recommend qBittorrent but use whatever you are comfortable with.
Once everything is ready, plug in the USB with Ubuntu image to your laptop and follow installation instructions on the Ubuntu page. You can also find a YouTube vid to help you thought the process. Here is one https://www.youtube.com/watch?v=K2m52F0S2w8.
Select following additional packages:
-
openssh
-
docker
During the “SSH Setup” phase, make sure to select “Allow Password Authentication over SSH”. This will allow for a quick login without setting up PKI. Once you are happy with the setup and will want to keep it running, it is easy to disable it and swap to key based authentication mode.
Enable Wi-Fi [Optional]
After first boot I have decided to enable Wi-Fi since I only have one Lan cable. This is optional if you have dedicated cable for your laptop.
Disable default lid actions
Typically laptops are used as desktop devices and are configured with screen/power saving options. One of such options is powering off or hibernating when laptop lid is closed. Let’s change it to make sure our laptop stays on even when lid is closed.
Create virtual machines with Multipass
Multipass is a lightweight VM manager for Linux, Windows and macOS. It’s designed for developers who want a fresh Ubuntu environment with a single command. It uses KVM on Linux, Hyper-V on Windows and HyperKit on macOS to run the VM with minimal overhead. It can also use VirtualBox on Windows and macOS. Multipass will fetch images for you and keep them up to date. Since it supports metadata for cloud-init, you can simulate a small cloud deployment on your laptop or workstation. canonical/multipass *Multipass is a lightweight VM manager for Linux, Windows and macOS. It's designed for developers who want a fresh…*github.com
Install k3s server and agent
Since the laptop spec is pretty low, especially on memory side, we need a Kubernetes distribution that works well on low end hardware.
There are two choices:
I have selected k3s as I’m familiar with it and at the end I want to be able to manage my cluster with Rancher Management.
If you are interested in reading more about comparison between k3s and k0s here is a good blog: https://saiyampathak.medium.com/k0s-yet-another-kubernetes-distro-7201ea425165
After installation, let’s make sure that our cluster is up and running
Login to ks3 server vm
multipass shell ks3-server
Check if the nodes are up and running
kubeclt get nodes
The output should be similar to this:

A quick note on taints. Normally we wouldn’t want our workloads running on master node and use taints and tolerations to make sure pods are scheduled only on a worker node. In our case, since the setup is not HA (Highly Available) due to hardware resources constrains, we are going to allow pods scheduling on a master node.
Setup Load Balancer
Our setup so far consists of bare metal “server” with 2 vms on it. In order to establish traffic between host pc (windows 10 in my case) and the Kubernetes cluster, we need to make sure that all requests sent to the server are forwarded to Kubernetes IP or our k3s-server vm.
To do this, we will use nginx and replace default config with load balancing to our cluster.
https://ubuntu.com/tutorials/install-and-configure-nginx#4-setting-up-virtual-host
sudo apt install nginx

sudo cat >/etc/nginx/nginx.conf<< EOF

events {}

stream {
 upstream k3s_servers {
  server ${K3S_NODEIP_SERVER}:6443;
 }

server {
 listen 6443;
  proxy_pass k3s_servers;
 }
}
EOF
Connect to the cluster from your PC
We have a running 2 nodes cluster. Now, let’s connect to it from our home PC.
Before connecting from our PC, we need to copy kube config setup from the vm and merge it with our kube config file on home PC.
I advise upgrading kubectl to latest version beforehand, follow the installation steps from Kubernetes page.
Login to k3s-server vm
multipass shell k3s-server
Copy content of the kube config
kubectl config view --raw
Create a new file on your machine in the ~./kube directory and copy content
cat > config_k3s [enter] paste content [enter — adds one line to the file] [Ctrl + C — exit]
Merge two config files using KUBECONFIG variable
KUBECONFIG=/root/.kube/config:/root/.kube/config_k3s
If you want to learn more about managing kube config, please visit Kubectl context and Configuration on Kubernetes.io
Make sure you swapped to a newly created context.
Check all contexts
kubectl config get-contexts
Swap to "default" (this is the name in my case)
kubectl config use-context default
Now running the kubectl get nodes command form your home PC terminal should result in the same output.
Install cluster visualization tools
Finally let’s install 2 of my favorite cluster visualization tools:
-
Octant is a VMWare open source cluster visualizer, running in a browser so no local installation is required.
-
k9s is a really amazing console based cluster visualization tool.
Install Rancher to manage your cluster [Optional]
There are many options to install Rancher on any Kubernetes platform. Since this example is for testing purposes, we will follow the installation steps using Rancher in docker.
Run a sample workload
Let’s make sure our cluster can accept and serve simple workloads
Since we have exposed a deployment on NodePort, we need to see what port was assigned by Kubernetes:
Check node port
kubectl get svc

Summary
This installation should serve as introduction to setting up home lab even with old laptop and starting to play around with Kubernetes. There are many things we haven’t tried or tested and I encourage you to try on your own and share your experiences.
Additional resources
Here is a list of additional resources and some materials I used when creating this blog.
K3s can be installed much easier using a tool called k3sup, check out repo from Alex Ellis on GitHub: alexellis/k3sup *k3sup is a light-weight utility to get from zero to KUBECONFIG with k3s on any local or remote VM. All you need is ssh…*github.com
If you would like to learn how to script some of the manual operations, check out this repo from Sebastiaan van Steenis working in Rancher superseb/multipass-k3s Use multipass instances to create your k3s cluster - superseb/multipass-k3sgithub.com
If you would like to go through similar setup, but with video, I highly recommend checking out Techno Tim’s YouTube channel.
Finally if you are interested in learning more about k3s, here is a good overview:
So far this setup was done mostly manually, in next blogs I will look into automating the rancher deployment using terraform provider for Rancher 2
https://registry.terraform.io/providers/rancher/rancher2/latest/docs
If you encounter any issues along the way, found a bug or simply want to share your ideas, please drop a comment and have fun experimenting with your home lab :)