Kubernetes
Overview
This documentation assumes basic knowledge of Kubernetes and kubectl. To learn or refresh on container orchestration related concepts, please refer to the official documentation:
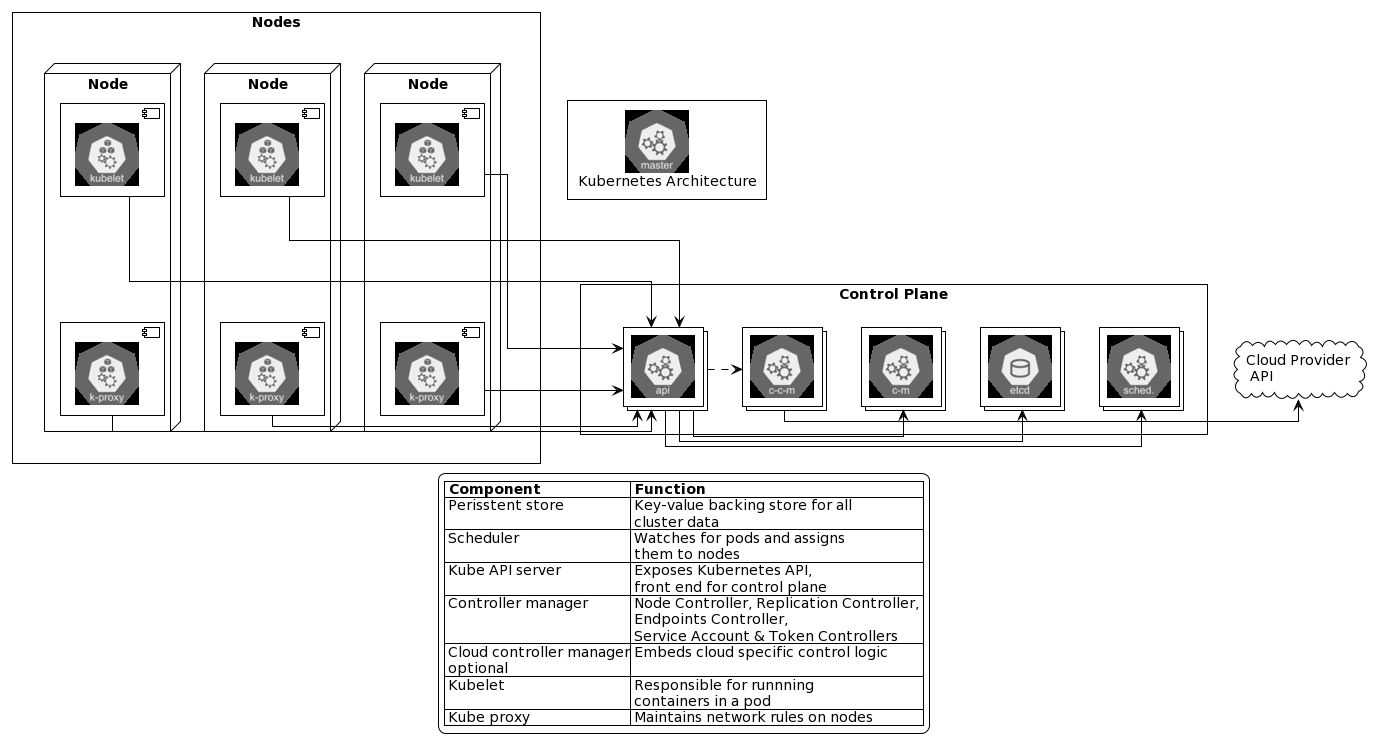
Basic Concepts
Development
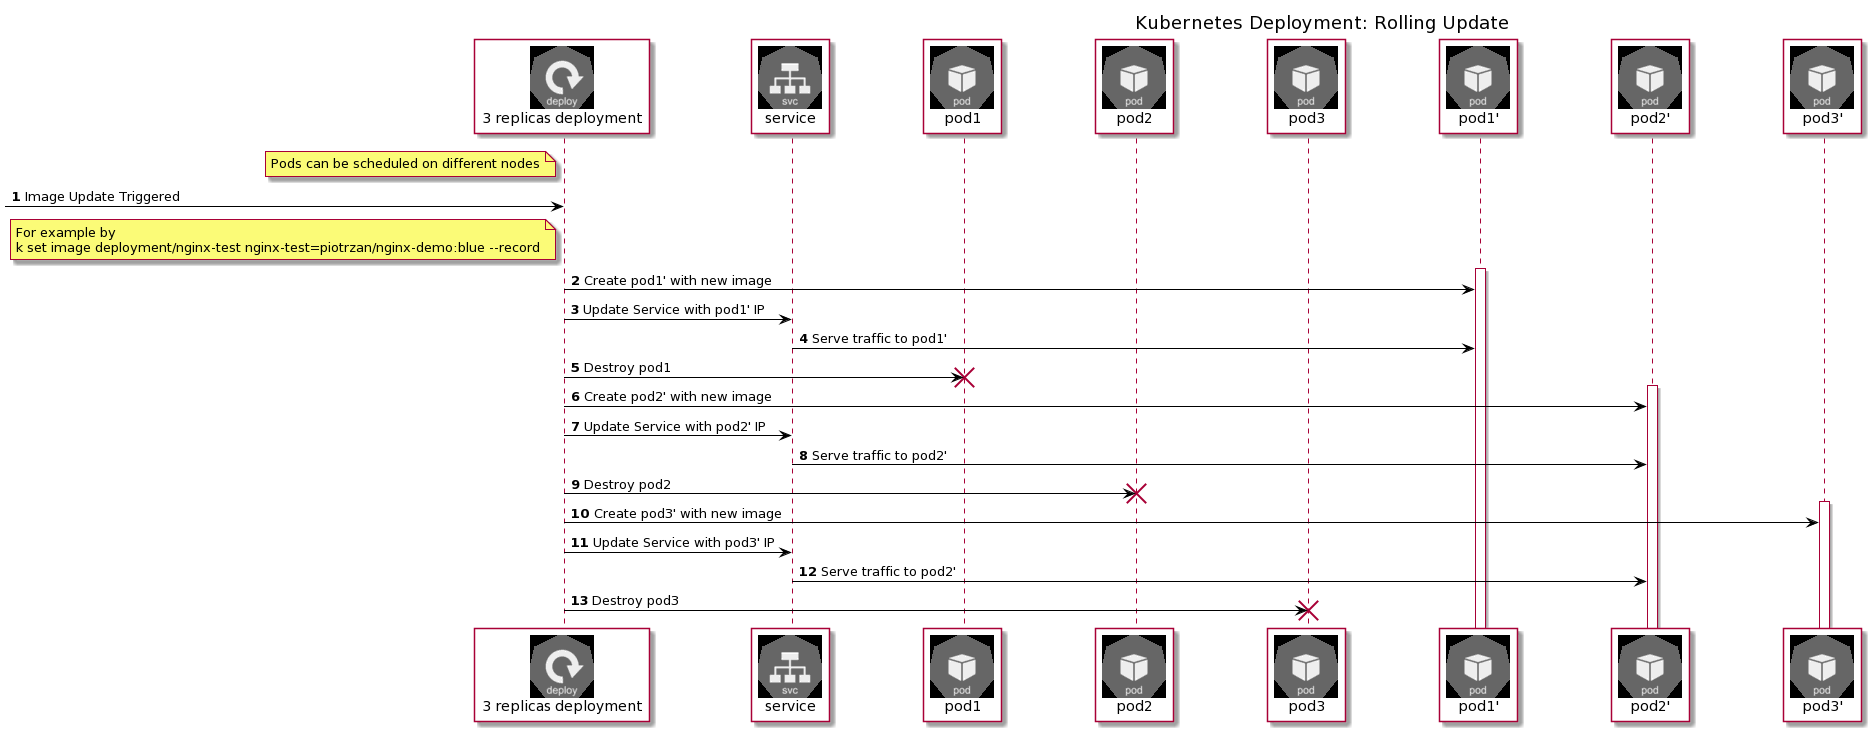
Understanding Pod Lifecycle
Developing with Kubernetes in mind means developing Cloud Native applications.
CNCF defines cloud native as (emphasis mine):
Cloud native technologies empower organizations to build and run scalable applications in modern, dynamic environments such as public, private, and hybrid clouds. Containers, service meshes, microservices, immutable infrastructure, and declarative APIs exemplify this approach.
These techniques enable loosely coupled systems that are resilient, manageable, and observable. Combined with robust automation, they allow engineers to make high-impact changes frequently and predictably with minimal toil.
Source: https://github.com/cncf/foundation/blob/master/charter.md
The role of Kubernetes
Kubernetes is a container orchestrator. It is a system that manages the lifecycle of a collection of containers. Think of it as an underlying fabric that allows you to deploy and manage your applications.
Cloud Native Development Workflow with Containers/Kubernetes
The development process for cloud native applications covers the same steps as in inner development loop, but with a few differences:
-
Development Tools and IDEs: Use service like Gitpod or GitHub Codespaces or simply encapsulate your development environment in an image and run a docker container to quickly spin up your development environment. This is independent from your local setup. Now you are ready to start developing in VS Code Electron Client, VC Code in browser or Visual Studio 2019 in a remote environment. Your machine does not need any SDKs, frameworks, linters, IDE plugins and addons or any tooling installed locally. Everything is pre-packaged in a containerized, repeatable environment.
-
Setup Development Environment: Use tools like Okteto, DevSpace, Skaffold or many others to bring your development and debugging into remote Kubernetes clusters without needing to install Docker or Kubernetes locally.
-
Run code to see if it works: Let your tools work for you and run and debug code directly in remote Kubernetes cluster. Nothing needs to be installed locally, in some cases not even docker engine.
-
Inner Development Loop. Inner development loop now can look like regular 4 step development loop!
-
Code directly in container instance or Kubernetes
-
Build is done remotely in a container instance or Kubernetes
-
Test can be done equally seamlessly as everything is already in a container instance or Kubernetes
-
Commit once committed, a new image version will be uploaded to artifacts repository and either docker instance or Kubernetes pod will be updated with new content
Create and maintain Kubernetes configuration files
Each service, API or application must have set of Kubernetes configuration files such as:
- Deployments
- Services
- Pods
- HPAs
- Config Maps
- Secrets
Kubernetes config files should be part of the same repository as App or Service.
Recommended repository setup
Define Liveness and readiness probes
- performance metrics and resources quotas
- in case of APIs/web implement
health,versionendpoints - define conditions to determine if the application or service is ready to accept traffic (readiness probe)
- define conditions to determine if the application or service is responsive, health-check (liveliness probe)
Security
The 4C's of cloud-native computing
The 4C's of cloud-native computing represents security in depth where each "C" stands for level of isolation from outside in.
| Layer | Description |
|---|---|
| Cloud | Security of entire infrastructure hosting the servers. Public/Private etc. |
| Cluster | Kubernetes cluster |
| Container | Docker containers. Running, for example in privilege mode. |
| Code | Binaries, source code, code configuration, no TLS, variables in code, etc. |
Admission controllers
Image policy webhook
Admission configuration
apiVersion: apiserver.config.k8s.io/v1
kind: AdmissionConfiguration
plugins:
- name: ImagePolicyWebhook
  configuration:
    imagePolicy:
      kubeConfigFile: <path-to-kubeconfig-file>
      allowTTL: 50
      denyTTL: 50
      retryBackoff: 500
      defaultAllow: true
defaultAllow: true if admission webhook server is not reachable, all request will be allowed
Enable admission controller
If Kubernetes components are deployed as daemons, edit service configuration file by systemctl edit service_name, else if Kubernetes has been deployed using kubeadm, simply edit pod manifest vim /etc/kubernetes/manifests/kube-apiserver.yaml and add ImagePolicyWebhook to --enable-admission-plugins= section as well as pass admission control config file via --admission-control-config-file=
Secrets
to switch off auto-mounting secrets on the pod, use automountServiceAccountToken: false
Pod Decision Tree
Seccomp
How syscalls work
How to check if Seccomp is enabled
grep -i seccomp /boot/config-$(uname -r)
Check seccomp status on the process
# 1. ssh into the container
# 2. list processes
ps -ef

# 3. grep for seccomp status
grep -i seccomp /proc/{PID}/status
If the result is 2 meaning that seccomp is enabled for the container
Seccomp modes
| Mode | Description |
|---|---|
| Mode 0 | Disabled |
| Mode 1 | Strict - will block all calls except read, write, exec, sigreadon |
| Mode 2 | Filtered - filter selectively |
Seccomp filter json file
there are 2 profile types:
- whitelist: only specified syscalls are allowed, all others are rejected
- blacklist: all syscalls are allowed unless specified in the file
Docker seccomp filter
By default, Docker enables seccomp filter (mode 2).
It blocks around 60 of the around 300 syscalls available with default profile
How to check what syscalls are blocked?
Run amicontained tool as container to see syscalls blocked by default docker profile
docker run r.j3ss.co/amicontained amicontainedRun amicontained tool as pod to see syscalls blocked by Kubernetes default profile
k run amicontained --image r.j3ss.co/amicontained amicontained -- amidontainedcheck pod logs
k logs amicontained
Enable seccomp in Kubernetes
Create a pod using yaml spec and enable RuntimeDefault profile under securityContext of pod
spec:
  securityContext:
    seccompProfile:
      type: RuntimeDefault
Custom seccomp profile in Kubenetes
[!ATTENTION] default seccomp profile is located at
/var/lib/kubelet/seccomp. Custom seccomp profile path must be relative to this path
apiVersion: v1
kind: Pod
metadata:
  name: audit-pod
  labels:
    app: audit-pod
spec:
  securityContext:
    seccompProfile:
      type: Localhost
      localhostProfile: profiles/audit.json
  containers:
  - name: test-container
    image: hashicorp/http-echo:0.2.3
    args:
    - "-text=just made some syscalls!"
    securityContext:
      allowPrivilegeEscalation: false
In order to apply new seccomp profile, pod must be deleted and re-created. use k recreate -f command
Seccomp logs
By default seccomp logs will be saved in /var/log/syslog
You can easily tail logs for specific pod by tail -f /var/log/syslog | grep {pod_name}
AppArmor
- restrict access to specific objects in the system
- determines what resources can be used by an application
- more fine grained control than seccomp
- installed in most systems
- AppArmor profiles are stored under
/etc/apparmor.d/
Example AppArmor Profile
#include <tunables/global>

profile k8s-apparmor-example-deny-write flags=(attach_disconnected) {
  #include <abstractions/base>

  file,

  # Deny all file writes.
  deny //** w,
}
Check if AppArmor is running
systemctl status apparmor- is AppArmor module enabled?
cat /sys/module/apparmor/parameters/enabled - is AppArmor profile loaded into kernel?
cat /sys/kernel/security/apparmor/profiles - use
aa-statusto check what profiles are loaded
AppArmor profiles load modes
| Mode | Description |
|---|---|
| enforce | enforce and monitor on any app that fits the profile |
| complain | log as events |
| unconfined | any task allowed, no logging |
AppArmor in Kubernetes
- support added in v 1.4, but still in beta
- to load profile from default location use
apparmor_parser -q /etc/apparmor.d/{profile_name}
to secure a pod an annotation in this format container.apparmor.security.beta.kubernetes.io/<container_name>: localhost/profile_name OR runtime/default OR unconfined
Use Case
AppArmor can be used to for example restrict access to a folder inside pod/container.
Linux Capabilities
-
Capabilities are added and removed per container
securityContext:
  capabilities:
   add: ["CAP1"]
   drop: ["CAP2"]
To check what capabilities are needed for any give command run getcap /<path>/<command> or to check capabililties used by a running process run getpcaps PID
When to choose which
When should which tool be selected? Here is list of use cases and corresponding tools.
| Scenario | Tool |
|---|---|
| Reduce risk of exploiting kernel vulnerability | Seccomp |
| Prevent app/container from accessing unwanted resources (files, directories, etc) | AppArmor |
| Reduce the risk of what compromised process can do to a system (coarse-grained) | Linux Capabilities |
Containers Isolation
gVisor
Kata Containers
this requires nested virtualization (in case of running workloads on VMs) and can degrade performance. Some cloud providers do not support nested virtualization.
Containers isolation in Kubernetes
- run a container with kata container runtime:
docker run --runtime kata -d nginx - run a container with gVisor runtime:
docker run --runtime runsc -d nginx
- Create runtime object
- use
runtimeClassNameon pod definition level to use the runtime
Falco
Project created by Sysdig and donated to CNCF.
Secure and monitor linux system using eBPF probes.
Main usecases
- runtime observability and security
- rules engine for filtering
- notifications and alerting (remedy is possible with additional tools)
Falco components
High-level overview of falco components:
source: https://falco.org/docs/#what-are-the-components-of-falco
Falco rules & alerts
Falco comes with pre-defined set of rules and alerts/actions that can be triggered by those rules (bolded ones are more relevant to containerized workloads):
source: https://falco.org/docs/#what-does-falco-check-for
Falco configuration
- configuration is stored in /etc/falco/falco.yaml
- default rule set is stored in falco_rules.yaml
- file to override rules is falco_fules.local.yaml
Using Falco
Start Falco as a service
systemctrl start falco
Check Falco logs
journalctl -fu falco
Links and Resources
- Sysdig Blog: Manage AppArmor profiles in Kubernetes with kube-apparmor-manager
- Kubernetes Docs: Restrict a Container's Access to Resources with AppArmor
Build & Ship
Build Applications with Helm charts
- applications are going to be packaged and deployed using Helm. Helm is Kubernetes native package manager
Deployment Overview
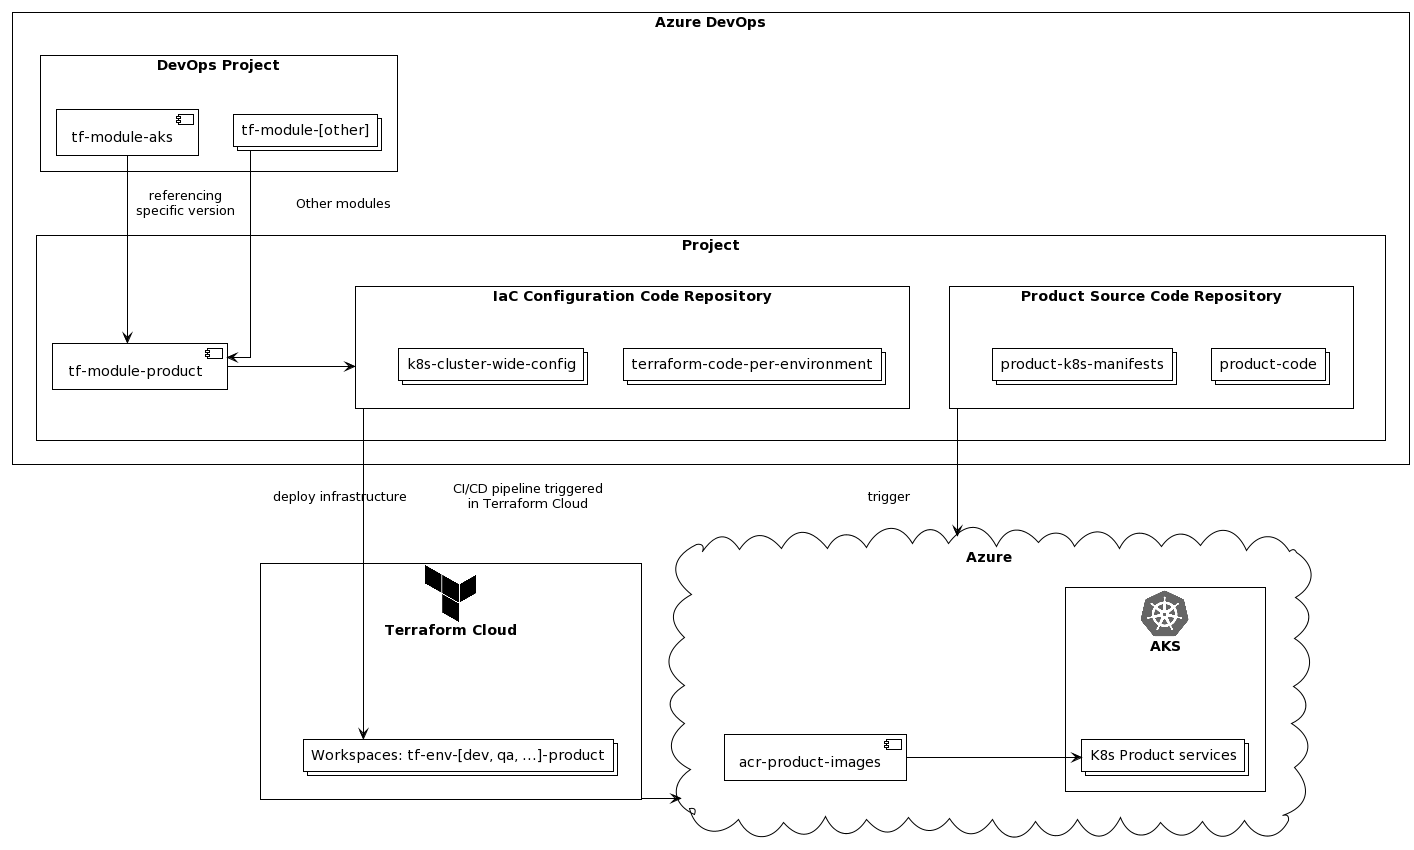
Here is a sample overview of deploying infrastructure and utilizing terraform modules and TACOS provider (in this case Terraform Cloud) to deploy the infrastructure to on-prem/cloud providers.
Operations
Projects and Teams Tenancy
- each project/product should have their own cluster cluster instead of co-hosting products on the same cluster to avoid namespace collisions.
- each environment (DEV, Test, etc) will have its own dedicated cluster per project/product
consider using Capsule if you want to make your clusters multi-tenant.
Additional tools on the cluster
- after cluster is up wa want to install and configure additional components
- use Atrifact Hub to deploy well known components
[!WARNING] Only Install tools from verified or trusted sources
List of tools that should be installed
- Open Policy Agent enables usage and enforcing of policies in the cluster as part of centralized governance
- Horizontal Pod Autoscaler enables auto scling of Kubernetes pods based on the resources usage patterns
- Falco Falco, the cloud-native runtime security project, is the de facto Kubernetes threat detection engine
Roles and Access
- use Azure RBAC integrated with K8s roles to manage access to cluster
- access to cluster via roles/etc
Observability
- use Azure native tools (Azure Monitor)
Useful Commands & Aliases
Check last 10 events on pod
Command: k describe pod <pod-name> | grep -i events -A 10
When is it useful: after creating/modyfing pod or during troubleshooting exercise check quickly if there are no errors in pod
Result: List of events in given pod
Determine proper api_group/version for a resource
Command1: k api-resources | grep -i "resource name"
Command2: k api-versions | grep -i "api_group name"
Example:
k api-resources | grep -i deploy -> produces apps in APIGROUPS collumn
k api-versions | grep -i apps -> produces apps/v1
Switch to namespace as default
Command: kubectl config set-context --current --namespace=new namespace
When is it useful: sometimes it is easier to switch to change namespace to default instead of appending namespace all the time
Result: kubeclt commands will be executed in new namespace by default
: Sometimes it is difficult to see what namespace is currently active, use kube-ps1 plugin to show namespace and cluster in command line prompt
Get help for different k8s resources
Command: kubectl explain pods.spec.containers | less
Command variation 1: kubectl explain pods.spec.containers --recursive | less (use to include info about all child resources as well)
Display all k8s resources
Command: kubectl api-resources -owide
When is it useful: check which resources are namespaced and also see what shortcuts to use to refer to a resource to save up on typing
Result: list of all resources available in the cluster
Use busybox for running utilities
BusyBox: The Swiss Army Knife of Embedded Linux BusyBox combines tiny versions of many common UNIX utilities into a single small executable. It provides replacements for most of the utilities you usually find in GNU fileutils, shellutils, etc. The utilities in BusyBox generally have fewer options than their full-featured GNU cousins; however, the options that are included provide the expected functionality and behave very much like their GNU counterparts. BusyBox provides a fairly complete environment for any small or embedded system.
BusyBox has been written with size-optimization and limited resources in mind. It is also extremely modular so you can easily include or exclude commands (or features) at compile time. This makes it easy to customize your embedded systems. To create a working system, just add some device nodes in /dev, a few configuration files in /etc, and a Linux kernel.
Command: kubectl run -it --rm debug --image=busybox --restart=Never -- sh
When is it useful: this command will create temporary busybox pod (--rm option tells k8s to delete it after exiting shell). Busybox contains lots of utility commands
Verify pod connectivity
Command:
kubectl run -it --rm debug --image=radial/busyboxplus:curl --restart=Never -- curl http://servicename
When it is useful: when making changes to a pod, it is very important to veryify if it works. One of the best wayst to verify is to check pod connectivity. If succesfull this command will return a response.
Retrieve token from secret to access dashboard
Command:
kubectl -n kubernetes-dashboard get secret \
$(kubectl -n kubernetes-dashboard get sa/admin-user -o jsonpath="{.secrets[0].name}") \
-o go-template="{{.data.token | base64decode}}"
When is it useful: when logging in to Kubernetes dashboard.
Result: token ready to be pasted in the token field of Kubernetes dashboard.
Create k8s resource on the fly from copied YAML
Command:
cat <<EOF | kubectl create -f -
<YAML content goes here>
EOF
Command alternative: alternatively use cat > filename.yaml [enter] [Ctrl + Shift - to paste file content] [enter - adds one line to the file] [Ctrl + C - exit] after that use vim/nano to edit the file and create resource based on it
When is it useful: sometimes it's quicker to just grab YAML from k8s documentation page and create a resource much quicker than writing YAML yourself
Useful Aliases
alias k=kubectl
alias ks='k -n kube-system'